Importance of microscopy for cell biologists in general and spermatologists specifically
Part 2: Checklist how to setup your microscope perfectly for microscopy in general and four types of microscopy important in Computer Aided Sperm Analysis.
In the first blog on Microscopy, I suggested that if you are serious about good microscopic images, you need to understand the basic concepts of microscopy such as Numerical Aperture and resolution and the best resolution that can be attained with light microscopy. Also if you do not understand the principles of Critical Illumination and Köhler illumination there is a 99% chance you use your microscope sub-optimally and even observe “artifacts” – meaning objects that are not true or correct.
In this blog I will focus on the main steps to setup your microscope perfectly for attaining ideal optical conditions and best visual images. Secondly, the ideal microscope conditions for the different aspects of CASA.
Setup (See Fig. 1 and 1b):
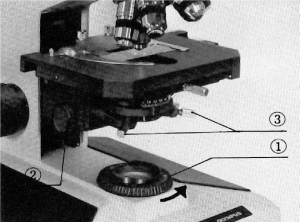
Fig. 1: 1 = Field iris diaphragm; 2 = knob for moving condenser up or down; 3 = Screws for centering diaphragm image: See Fig 1b below
- Make sure all optical components (condenser, objective and ocular lenses are free of dust and e.g. finger prints (quite common). Use filtered compressed air to blow dust away. If still not clean (finger prints) try and clean with distilled water and if that does not help clean with 95% alcohol and lens paper.
- Put slide on microscope stage and focus sharply on object (brightfield or phase contrast).
- Close field diaphragm (at base of microscope where light is emitted to condenser lens) and turn condenser up or down until you see the edges of the “fish eye-iris diaphragm” of field condenser sharply focused in the field of view.
- Center this bright spot and open the field diaphragm just enough to almost disappear from the field of view.
- Now refocus and start viewing perfect images. You now have Critical and Köhler illumination!

Fig. 1b: Showing field of view as well as focusing iris diaphragm and centering it
There are many different types of light microscopy but for CASA we typically use:
- Brightfield microscopy: Here the optical elements are very basic and stained specimens are required such as a sperm smear stained with SpermBlue.
- Positive phase contrast microscopy: Light is projected as a cone of light which is aligned to a phase plate of the same diameter inside the positive phase lens (Fig. 2). For SCA the x10 positive phase objective is used and in the Nikon microscope is marked as 10x, Ph 1. In SCA positive phase contrast is only used for human sperm and the main reason is that sperm are clearly observed as white objects but the granules from e.g. the prostate and most other granules are typical seen as black or grey particles. This is ideal as in 97% of samples sperm will be accurately followed without interference of “background noise – black particles”.

Fig. 2: The bright white circle represents the cone of light emitting from the condenser lens and the almost black circle is the “positive” phase plate (actually a furrow in the objective lens) and also showing the centering of cone of light to phase plate. Images b, d and f represent the sharpness of focusing of the light filament as settings are corrected.
Finally, and of utmost importance: PLEASE CARE ABOUT YOUR MICROSCOPE! KEEP IT CLEAN AND USE IT CORRECTLY. If not do not expect miracles during CASA analysis.
To be continue…
Gerhard van der Horst (PhD, PhD)
Senior Consultant
MICROPTIC S.L.
Leave A Comment